Upgrading
This section describes how to upgrade from a previous major version of OpenGeo Suite.
If performing a minor upgrade, you may proceed with a typical install.
Note
A “major” version upgrade is from version 3.x to 4.y. A “minor” version upgrade is from 4.x to 4.y.
Warning
This upgrade is not-backward compatible. Irreversible changes are made to the data so that they can’t be used with versions 3.x and below of OpenGeo Suite.
Back up PostGIS databases
The first step of the upgrade process is to back up your existing PostGIS data.
Ensure the old (3.x) version of OpenGeo Suite is running.
Make sure that the PostgreSQL bin directory is on your path. By default, this is C:\Program Files\OpenGeo\OpenGeo Suite\pgsql\9.1\bin though your installation may vary. To test that this is set up correctly, open a Command Prompt and type:
psql --versionIf you receive an error, type the following to temporarily add the above directory to your path:
set PATH=%PATH%;C:\Program Files\OpenGeo\OpenGeo Suite\pgsql\9.1\binTo backup, a specialized PostGIS upgrade utility is used. Download this utility, and extract the archive to a temporary directory. To avoid permissions issues, it is best to put this directory on your desktop or in your home directory. By default, the backup files created from using this script will be saved into this directory.
Run the backup command:
postgis_upgrade.exe backup --port 5432Note
For more information about supported options run postgis_upgrade.exe --help.
The script will run and create a number of files:
- Compressed dump files for every database backed up (<database>.dmp)
- SQL output of server roles
The PostGIS data backup process is complete. You may now shut down OpenGeo Suite 3.x.
Back up GeoServer data directory
Uninstalling OpenGeo Suite 3.x will not remove any of the GeoServer configuration so there is no need to make a back up. It can be copied into the correct location during restore.
For OpenGeo Suite 3.x and earlier the default the data directory is located at <user_home_directory>\.opengeo\data_dir.
For OpenGeo Suite 4.x and above the default data directory is located at C:\ProgramData\Boundless\OpenGeo\geoserver.
Uninstall old Suite
The next step of the process is to uninstall OpenGeo Suite 3.x. The uninstaller can be run directly from the Windows Start Menu.
Install new Suite
You are now ready to install the new version of OpenGeo Suite. To do so follow the instructions in the OpenGeo Suite for Windows section.
In order to run the PostGIS restore script you must select the PostGIS client tools as part of the new install.
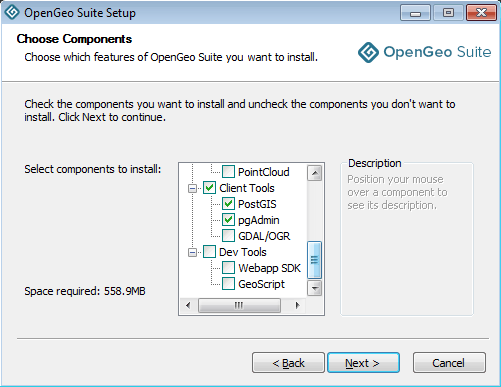
Installing PostGIS client tools
Restore PostGIS databases
Ensure the OpenGeo PostgreSQL service is running.
Ensure the PostGIS/PostgreSQL commands are on the path. From a command prompt, type the command:
psql --versionIf you receive an error re-run the installer and install the PostGIS client tools, as described in the previous section.
Restore your PostGIS data by running the upgrade utility again with the “restore” argument:
postgis_upgrade.exe restoreYour databases and roles will be restored. You can verify that the databases were created and data restored by running psql -l on the command line.
Restore GeoServer data directory
- Stop the OpenGeo Jetty service if it is running.
- Restore the GeoServer data directory:
- Delete or rename the new default data directory, located at C:\ProgramData\Boundless\OpenGeo\geoserver.
- Copy the existing contents of <user_home_directory>\.opengeo\data_dir to C:\ProgramData\Boundless\OpenGeo\geoserver.
- Restart the OpenGeo Jetty service.