Setting the Oracle JVM
We recommend using the Oracle JVM with OpenGeo Suite, as testing has shown that the Oracle JVM is significantly faster than other JVM implementations.
Specifically, we recommend using Oracle JRE 6. Even though it isn’t the latest version, it is the most well-tested and stable version of the JVM with GeoServer.
Determining the current Java version
You may wish the verify the version of Java you have.
Windows
OpenGeo Suite for Windows bundles the Oracle JRE in its package, so there is no need to do anything here.
All other systems
For all other systems, run this command:
java -version
You should see something like this:
java version "1.6.0_32"
Java(TM) SE Runtime Environment (build 1.6.0_32-b05)
Java HotSpot(TM) 64-Bit Server VM (build 20.7-b02, mixed mode)
The above example is running the Oracle JVM version 6 (1.6). If your output says “IBM”, “OpenJDK”, or anything like that, it is not running the Oracle JVM.
If you receive an error that Java is not on the path, you may wish to look at the JAVA_HOME environment variable.
Note
On OS X, you can use the /usr/libexec/java_home tool to determine the current path to Java. See the Mac Developer Library for more information.
Changing to the Oracle JRE
Windows
As mentioned above, OpenGeo Suite for Windows automatically includes the appropriate JRE. No action is needed.
If running OpenGeo Suite for Application Servers on a Windows system, see below.
All other systems
First, download the Oracle JRE. In your browser, navigate to http://www.oracle.com/technetwork/java/javase/downloads/jre6downloads-1902815.html. This is Oracle’s download page for JRE 6.
Click the radio box to accept the license agreement and then click the download link that matches your system. Save it to your temporary directory or your desktop.
In a terminal, change to that directory and run the file. For example:
./jre-6u45-linux-x64.binA jre1.6.0_45 directory will be created. Move this directory to /usr/lib/jvm (or wherever you’d like to place your JRE):
sudo mv jre1.6.0_45 /usr/lib/jvm(Optional) Change your JAVA_HOME environment variable to point to this new directory:
export $JAVA_HOME=/usr/lib/jvm/jre1.6.0_45Make sure that your application server (Jetty, Tomcat, etc.) is using this new Java. (It may be reading the JAVA_HOME environment variable, but not necessarily.) If using Tomcat, open /etc/default/tomcat6 in a text editor (or equivalent for your system):
Scroll down to the setting of the JAVA_HOME variable. Add the line:
JAVA_HOME=/usr/lib/jvm/jre1.6.0_45Save and close the file. Restart Tomcat.
If you didn’t change the default JVM for your system, you’ll need to ensure that the application server is using the correct Java. You can verify this in GeoServer by navigating to the Server Status page.
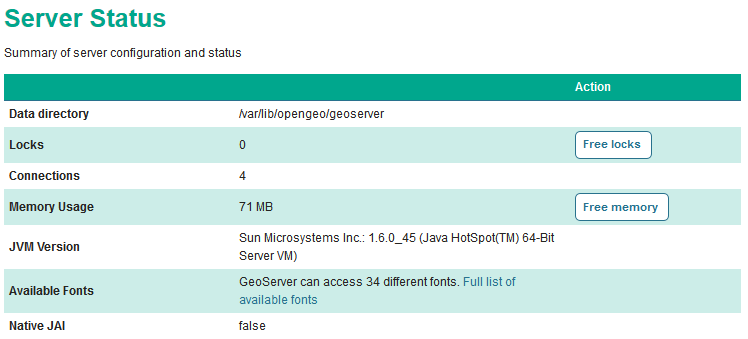
Server Status showing Oracle JRE
On the line named JVM Version, you should see the Oracle JRE. (For historical reasons, it will be shown as “Sun Microsystems.”)
Note
Read more about running OpenGeo Suite in Production.